Fallout 4 Installation#
NPCs redefined
General info#
(click the arrows below for more details on each topic)
🔍 What is Mantella?
Mantella Software is a client interface for Fallout 4 and other Bethesda games. It allows Fallout 4 to send user and game output to an LLM (large language model) AI and play the response in-game using the character’s voice—even taking in-game actions!
The result? NPC interactions where characters dynamically respond to events in the game world with on-the-fly, AI-generated dialogue—no more canned lines.
In other words, Mantella lets you step outside the script when talking to characters. Dialogue is dynamically generated, with each character having their own personality and history.
🆕 What's New?
A LOT has happened since Mantella 0.8.2. Here’s a quick rundown:
✅ Much Easier Install Process The main user feedback we got—installation was too complicated. We heard you! It’s now much more straightforward and has fewer required components.
🌐 New Web Browser UI On launch, Mantella opens a configuration tab in your default browser, letting you tweak settings on the fly.
🔌 F4SE Integration The Mantella mod now includes F4SE files for seamless communication between Mantella and Fallout 4.
🔊 Immersive Audio/Subtitles Mantella-generated dialogue now plays directly in-game through the engine’s subtitle and audio systems.
🔁 Fallout 4 NG Compatibility Works with the latest FO4 patch. Mantella no longer requires SUP F4SE or DLCs.
👁️ Vision Support (Optional) If your LLM supports image analysis, Mantella can use that to describe in-game scenes. This increases token usage and latency slightly.
🧱 Stability Boost Refactored code = fewer dropped conversations and better reliability.
🧠 Piper TTS Support Not to be confused with Piper the NPC. It’s a lightweight alternative to XTTS and xVASynth.
📦 Unified Mod Package Desktop and VR ESPs are now merged into a single plugin.
🛒 New Actions via Dialogue NPCs can now:
Open inventories for trading

Stay put during dialogue

Suppress most random scripted chatter during Mantella convos

Speak voiced player replies

Use a narrator voice for non-verbal actions
🐞 Multiple Bugfixes
⚙️ Features
🎙️ Interact with AI-powered NPCs using your voice or your keyboard
👥 Works with every NPC—even modded ones
🧾 600+ NPCs have unique personality backstories
🤖 Supports local and cloud LLMs including:
koboldcpp

text-generation-webui

OpenAI

OpenRouter
🔊 Supported Text-to-Speech Services:
🧼 Piper TTS
Lightweight and easy to install (~5GB), supports all voice types (including robots and mutants). Voices are monotone but resemble characters.

🧽 XVASynth
Medium difficulty install (~13GB), supports most voices. Voices can sound robotic, but plugins like DeepMoji Plugin  and Punctuation Pitch Adjuster  to help improve realism.
🧠 XTTS
Heavy on system resources (~3GB). Excellent human-quality voices. Struggles with robots/mutants and may produce unexpected accents.
🌍 Partial multilingual support
🧠 NPC memory for past conversations
🕵️ NPC awareness of world state:
Current location

Time

Equipping/swapping items

Sleeping

Radiation/regular damage

Power armor status

Player commands
💬 NPCs can:
Start conversations with each other (Radiant Dialogue)

Talk to multiple people at once

Become followers

React emotionally

Share their inventory

Respond to visual focus if vision analysis is enabled

Works with:

Fallout 4 (pre/post NG)

Fallout 4 VR
🧩 Components / Architecture Overview
Mantella weaves together multiple advanced technologies, offering deep customization and a dynamic gameplay experience.
Some of the key systems powering Mantella:
🤖 Large Language Models (LLMs)

🎙️ Speech recognition

🔊 Speech synthesis

👁️ Vision analysis

🧠 Character bios & conversation history tracking
Understanding these pieces—and how they interact—helps you get the most out of Mantella and tailor it to your playstyle. 🛠️ Core Components Installed with Mantella for Fallout 4:
Mantella.exe Application
Automatically starts with Fallout 4. It runs alongside the game and handles:

    📡 Communication with local or remote LLMs (formats requests/responses)

    🎤 Speech-to-text processing for vocal input

    🗣️ TTS engine communication, converting AI text into character voice lines

    🧠 NPC bio and conversation history management

MantellaLauncher (F4SE plugin)
Automatically starts Mantella.exe when Fallout 4 launches.

F4SE_HTTP (F4SE plugin)
Manages real-time communication between Fallout 4 and Mantella.exe.

TopicInfoPatcher (F4SE plugin)
Provides utility functions, including dynamic in-game subtitle support.

Mantella Papyrus Scripts
Directly interact with the Fallout 4 engine and in-game systems.

Data Files
Includes core files such as Mantella.esp, NPC bios, and configuration settings
Fallout 4 Mantella Installation#
If you get stuck anywhere in the installation process, please see Issues Q&A or reach out on Discord.
Requirements#
Hardware Requirements#
Keep in mind these are in addition to your FO4 RAM/VRAM requirements.
Minimum specifications if using external services #
DISK SPACE#
Between 6 to 7 GB of disk space.
CPU/RAM#
Piper TTS or XVASynth: If you are using external LLM services like OpenAI or Openrouter then the only requirements are running the text-to-speech and speech-to-text (if using the microphone). Piper (TTS) and Whisper (STT) can easily be run on most modern CPUs, the former uses about 0.1 GB of RAM and the latter about 1 GB.
XTTS: About 3-4 GB of RAM if using XTTS and Whisper at the same time.
GPU/VRAM#
Piper TTS + Text input 0.1 GB of VRAM if using text input and Piper TTS
Piper TTS + Whisper Approx one GB of VRAM if using Whisper’s voice recognition and Piper TTS.
XVASynth Will barely use any RAM if in CPU mode.
XTTS + Whisper 3–4 GB of VRAM if using XTTS and Whisper.
Minimum specifications if using external services#
In addition to the specs listed above : Minimum 6 GB of free RAM/VRAM, at least 12-15 is optimal if you want to run a good roleplay LLM locally.
Supported game versions#
Pre-NG (1.10.163.0) – December 2019 patch
NG (1.10.984.0) – April 2024 patch
VR (1.2.72.0)
Required files#
Mandatory#
The Mantella files can be downloaded from Nexus Mods.
File |
Installation |
|---|---|
This file can be installed in the same way as other mods with your mod manager. Be sure to use the latest version |
Mod manager#
Recommended: Mod Organizer 2
Alternative: Vortex
Other needed files#
Mandatory for desktop: Simple Text Field
Mandatory for all versions to make voice generation work : Fallout 4 Creation Kit
Troubleshooting files#
ONLY DO THESE STEPS BELOW IF YOU’RE EXPERIENCING ISSUES WITH VOICE GENERATION. BY DEFAULT THE CREATION KIT SHOULD BE SUFFICIENT TO MAKE VOICE GENERATION WORK.
ALTERNATIVE : Get the following files listed below IN THIS LINK HERE and copy them in this directory Data\Sound\Voice\Processing (or your mod manager’s equivalent path. For example for MO2 : [My Mantella Mod Name]\Sound\Voice\Processing)
FonixData.cdf
fuz_extractor.exe
xWMAEncode.exe
Get FaceFXWrapper.exe and put it in the same directory: link
Warning
On the first conversation run you might get prompted by Windows Explorer to install Microsoft .NET Framework 3.5. If that’s the case install it by following the windows prompts.
OPTIONAL: Alternative download links for the files
FonixData.cdf file: this link or this link, necessary for lip sync
xWMAEncode.exe: link, necessary for audio play : You only need to install the utilities from the installer then go to : [installation directory]\Microsoft DirectX SDK (June 2010)\Utilities\bin\x86\ to find the executable
fuz_extractor.exe: link, necessary for audio play
What it should look like for MO2 :

What it should look like for Vortex:

Installation Procedure#
Warning
For Mantella to work properly you have to enable archive invalidation in your Fallout 4 ini file if you haven’t already done so. See here for instructions.
Using Vortex or MO2#
Download and install F4SE (use the version compatible with your game)

Download and install Address Library

If not running VR, also install Simple Text Field

Install the Mantella mod from Nexus

Install the Fallout 4 Creation Kit
🛠️ Key Configurable Components#
Speech-to-Text(STT): Moonshine / Whisper#
Enable it in the Speech-to-Text tab of the config page
Adjust the audio threshold so Mantella can detect your voice reliably
Ensure your microphone is enabled via the holotape
Text-to-Speech Options#
Install these separately and set the paths in the Text-to-Speech tab of Mantella’s config page.
(click the arrows below for more details on how to install)
Piper (Preferred option)
Comes bundled with Mantella
Recommended for users without CUDA-compatible GPUs or who prefer a simple setup
xVASynth (optional)
Download xVASynth via Steam (preferred) or Nexus. Do not store xVASynth in your Fallout 4 game folder. For better output consider adding :
DeepMoji Plugin : For adjusted voice performance according to the emotion of the sentence (happy, sad, angry, surprised).
Punctuation Pitch Adjuster : For more realistic pitch fluctuation when exclamation and question marks are detected.
GPU (Optional)
NVIDIA cards that have CUDA can run xVASynth in GPU mode. Using the same GPU for both xVASynth and Fallout 4 may cause stutter. 2. Download the Fallout 4 voice models. You can either download all models via the xVASynth UI if you have Nexus Premium, or manually via the Nexus mods page:
xVASynth Model Installation Options
💎 Nexus Premium (Quickest)
If you are subscribed to Nexus Premium, (1.) open the xVASynth UI and select “Get More Voices” from the bottom left corner. (2.) Unselect all games except for Fallout 4, (3.) click “Check now” (you will be prompted to login to Nexus), then (4.) “Download All”.
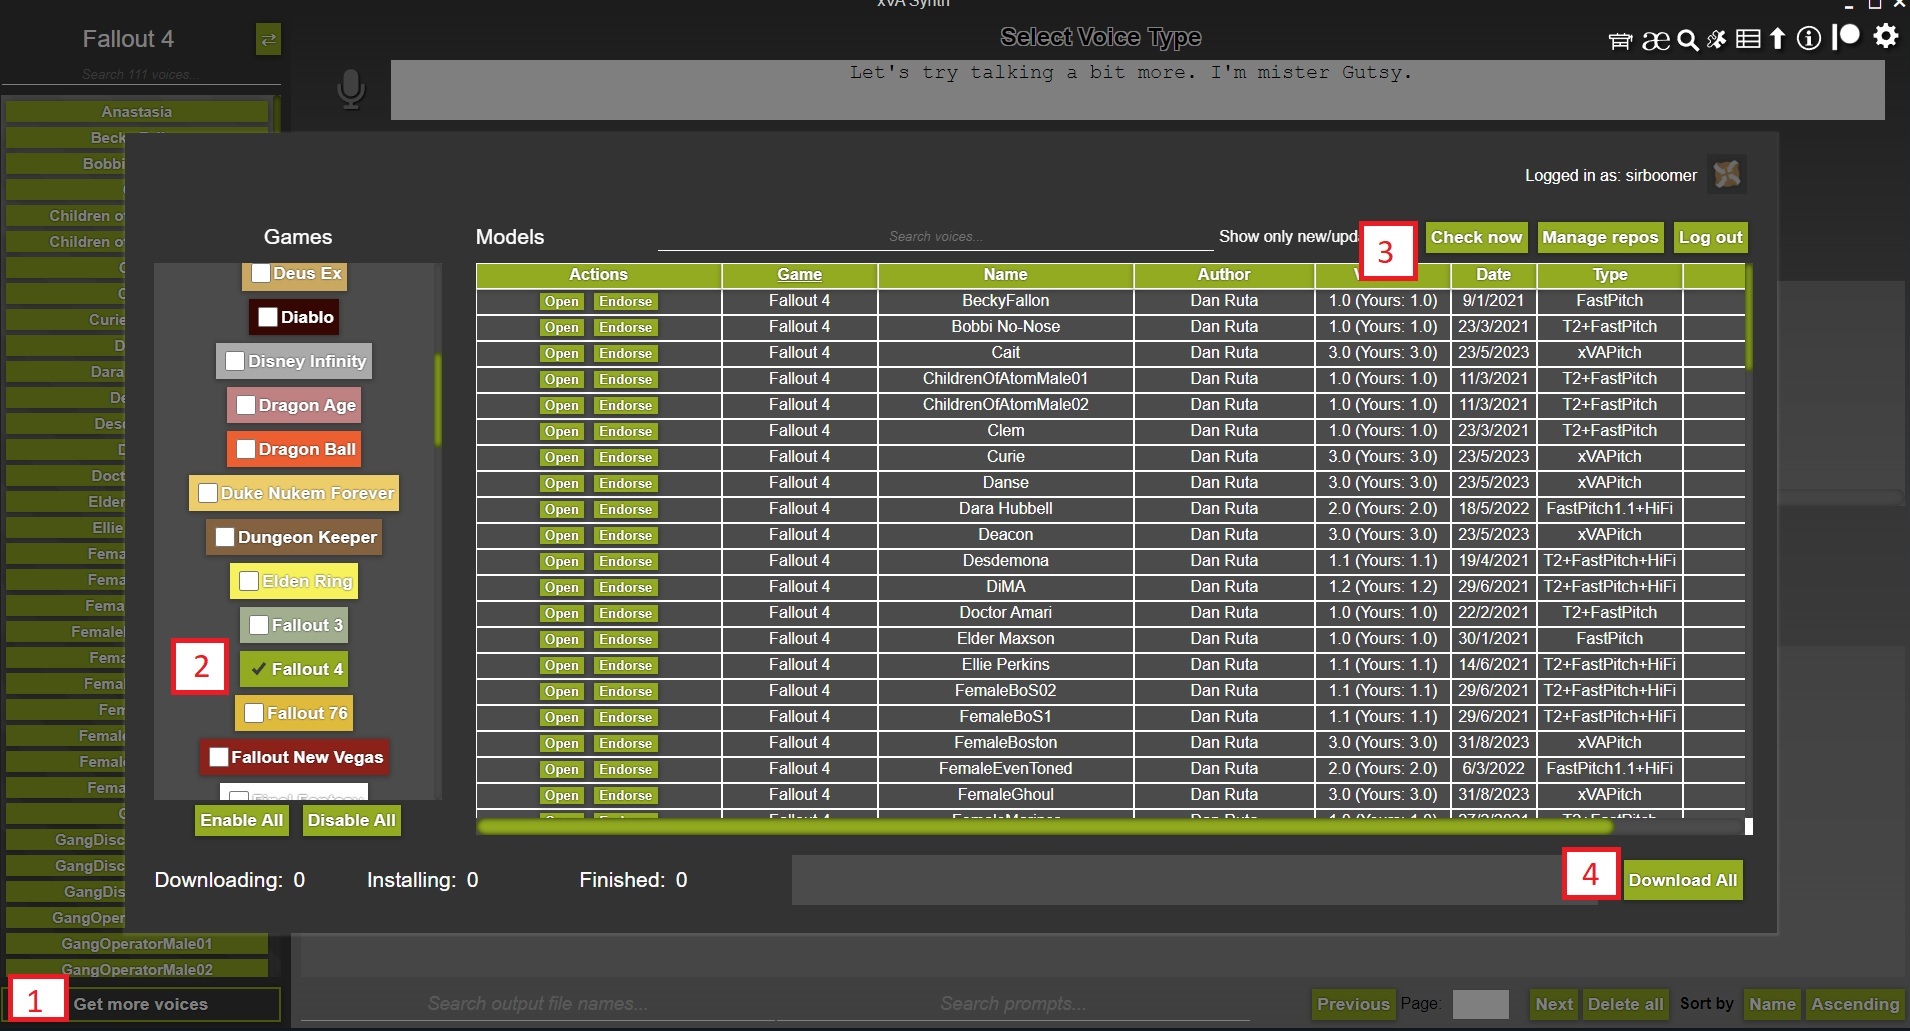
Note
You may need to restart the download a few times for all voice models to properly download.
Warning
If the first voice model never finishes installing. See if the game folder exists within resources/app/models. If it is not there, create it and retry. As this is a known bug of xVASynth: https://github.com/DanRuta/xVA-Synth/issues/59
🌊 Torrent (Slowest, Easiest)
Voice models can be downloaded via a single torrent. Torrents can be downloaded via BitTorrent clients such as qBittorent. Note that download speeds vary depending on the time of day. Paste the below magnet link in your browser to receive a popup to open it via your Bittorent client, and set the download location to your_xVASynth_folder/resources/app/models/ without creating an extra subfolder:
magnet:?xt=urn:btih:c9cd4a5f766bee3bdb758ff37578440a9ce2dee2&dn=Fallout_4_XVASynth_Voices&tr=udp%3A%2F%2Ftracker.opentrackr.org%3A1337&tr=wss%3A%2F%2Ftracker.openwebtorrent.com&tr=udp%3A%2F%2Fexplodie.org%3A6969&tr=wss%3A%2F%2Ftracker.btorrent.xyz
🛠️ Manual
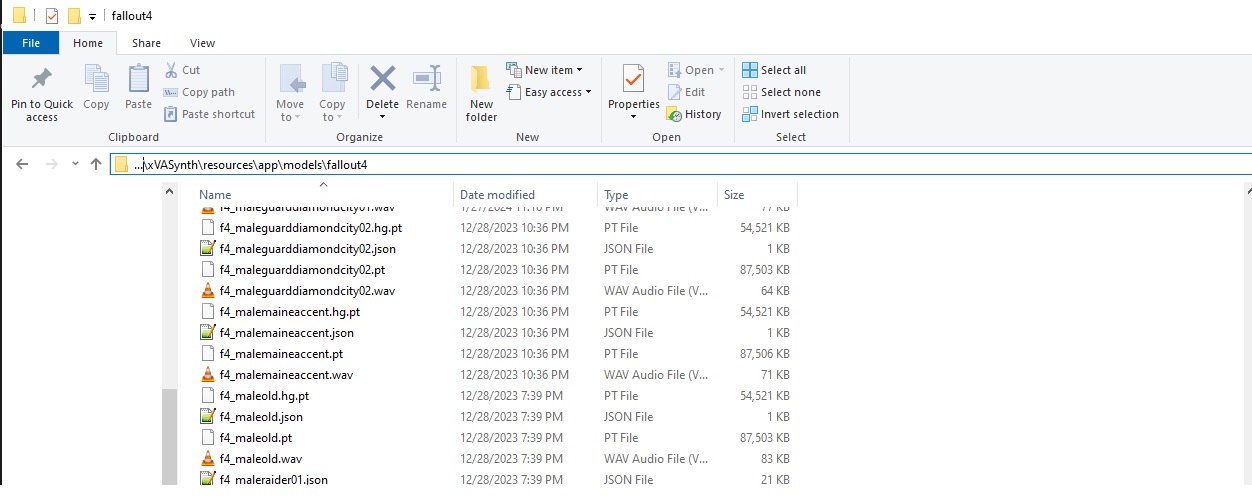
If you do not have Nexus Premium, you can also download the voice models directly from Nexus here (under “Optional”, not “Old”). Once you have manually downloaded each voice model into a folder, unzip the models manually into the correct xVASynth folder (xVASynth\resources\app\models\fallout4). Once the extraction is complete, you can delete the zipped voice model files.
The contents of xVASynth\resources\app\models\fallout4 should look like the below:
Note
If downloading all models sounds a bit daunting, you can start with the “Piper”, “MaleEvenToned”, “MaleBoston”, “FemaleBoston” voice models to allow you to talk to most generic human NPCs.
XTTS (optional)
LocalDownload MrHaurrus’s XTTS API server from here and unzip it.
Download the voice models (latents) folder called “english latent speaker for Fallout 4”. Extract this folder into the same folder as
xtts-api-server-mantella.exeabove. In other words, you should have a folder calledlatent_speaker_folderin your XTTS folder.Set
xtts_server_folderin MantellaSoftware/config.ini to the path of your new exe, andtts_serviceto “XTTS”.(Optional) Configure XTTS settings in the [Speech.Advanced] section of MantellaSoftware/config.ini. Note that if you are using an NVIDIA GPU, the
xtts_deepspeedsetting can improve response times by 2-4x if you also havextts_deviceset to “cuda”.
External (from $0.14/hr)
Make a RunPod account (https://www.runpod.io/) and add some credits ($10 minimum).
Follow this link to open the Mantella XTTS Pod. Choose a GPU to run the Pod with (if in doubt, choose the cheapest). Note that cheaper GPUs are available if you change the “Secure Cloud” setting to “Community Cloud”.
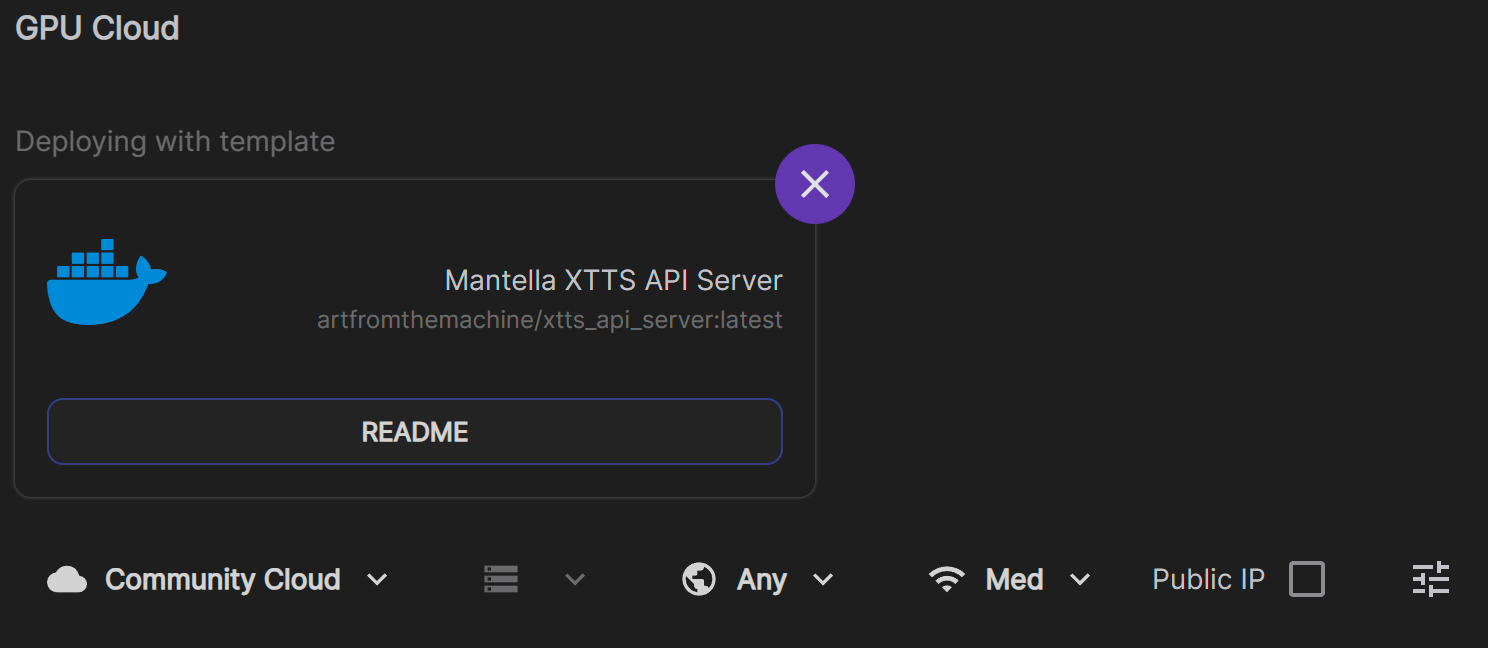
On the following two pages just click “Continue” and “Deploy” (you don’t need to change any settings here).
Once the Pod is running, select XTTS in the Text-to-Speech tab of the Mantella UI and set
XTTS URLtohttps://{pod_id}-8020.proxy.runpod.net/, with {pod-id} being the ID of the running Pod. Eghttps://a1b2c3d4qwerty-8020.proxy.runpod.net/.

It takes a few minutes for the Pod to start up, you can check the progress in Logs -> Container Logs from the Pod’s dropdown menu. It will say “Uvicorn running” when it is ready.
When you are finished using Mantella, make sure to delete the Pod so that you are no longer charged! It only takes a few clicks to set up a new Pod so don’t feel guilty about deleting it.
LLM / AI Options
(click the arrows below for more details on how to install)
Hosted
Create a free account with OpenRouter. Go to the “Keys” tab in the top right corner and generate a new key. Save the key value to the GPT_SECRET_KEY.txt file next to Mantella.esp
For other options, see link here for explanation on how to run this service
Local
Run small models locally—requires strong hardware. Recommended for offline use:
KoboldCPP

text-generation-webui

LMStudio
See link here for explanation on how to run this service
Vision
Enable in the Vision tab and/or the holotape.
Make sure your LLM supports image input
See link here for explanation on how to run this service
🚀 First Startup#
Start Fallout 4 in Windowed Mode (using F4SE)
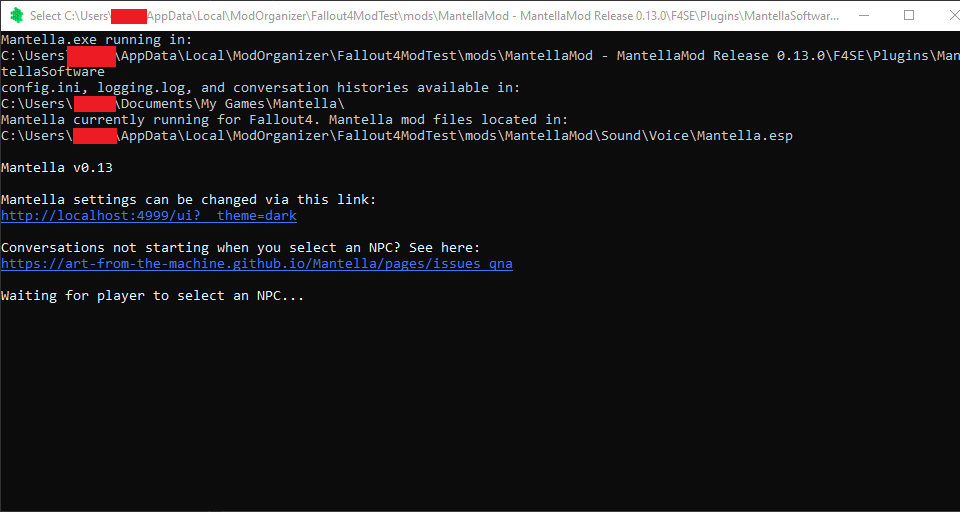
Mantella.exe should launch automatically — you’ll hear a guitar chord, confirming it launched successfully.
Stay on the main menu—do not load a save yet
Look for the Mantella.exe window — it might be behind the Fallout 4 window.
Getting startup errors? Try restarting Mantella Software via the holotape once (Main Settings).
The Mantella UI should open at first launch. If it does not, it can be accessed here: http://localhost:4999/ui/?__theme=dark.
Set up the following:
a model on the Large Language Model tab
a STT Service on the Text-to-Speech tab
a TTS service on the Text-to-Speech tab
After setup, exit Fallout 4 and close Mantella.exe
Start Fallout 4 again
Mantella.exe should say: Waiting for player to select an NPC…
If errors appear, double-check all paths in the config
Load a saved game that is past the first vault
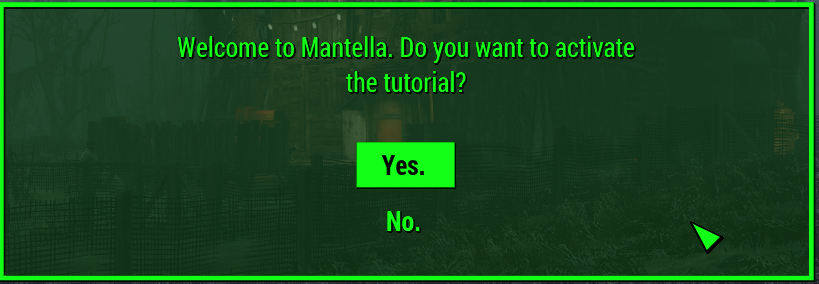
You’ll see notifications from Mantella
A tutorial prompt will appear the first time — it’s recommended to say yes for first-time users.
You should receive:
the Mantella gun
the settings holotape (the notification for the holotape might be skipped by the game, but it should still be in your inventory)
Use the Holotape to tweak more options
After your first conversation, Mantella will create folders in:
Documents\My Games\Mantella\data\Fallout4
character_overrides
conversations
Tip: If something goes wrong with the voice generation, try restarting Mantella using the holotape. You might need to install the files listed in this troubleshooting section.
You can also try restarting Mantella manually if issues persist. You’ll need to set all file paths manually for the Game tab and the Text-to-Speech tab.
Where to find Mantella to start it manually:
Vortex:
data\F4SE\Plugins\MantellaSoftwareMO2:
[Mod Manager]\F4SE\Plugins\MantellaSoftware
See the section below for help on manually customizing the Mantella Web-UI.
Managing and Customizing Mantella#
Mantella UI#
The Mantella UI should open in your browser when the Mantella window starts, but if it does not, it can be accessed here: http://localhost:4999/ui/?__theme=dark.
 See the link here to manually customize Mantella.
Mantella UI Configuration Page#
🎮 Game Tab#
Note: This tab is only accessible if you’re launching Mantella Software directly through Windows Explorer. The filepath should be automatically set if you’re launching Mantella Software through the game.
Game: Make sure this is set to the version of Fallout 4 you’re playing.
Fallout 4 / Fallout 4 VR: Path to Mantella Gun Mod.
See below for path examples depending on your mod manager:
Mod Organizer 2: Right-click the Mantella Mod in MO2 and click Open in Explorer to find the filepath.
Vortex: You can find your Mantella mod folder by going to
\Data\from your Fallout 4 game folder.Example:
C:\Games\Steam\steamapps\common\Fallout 4\Data\
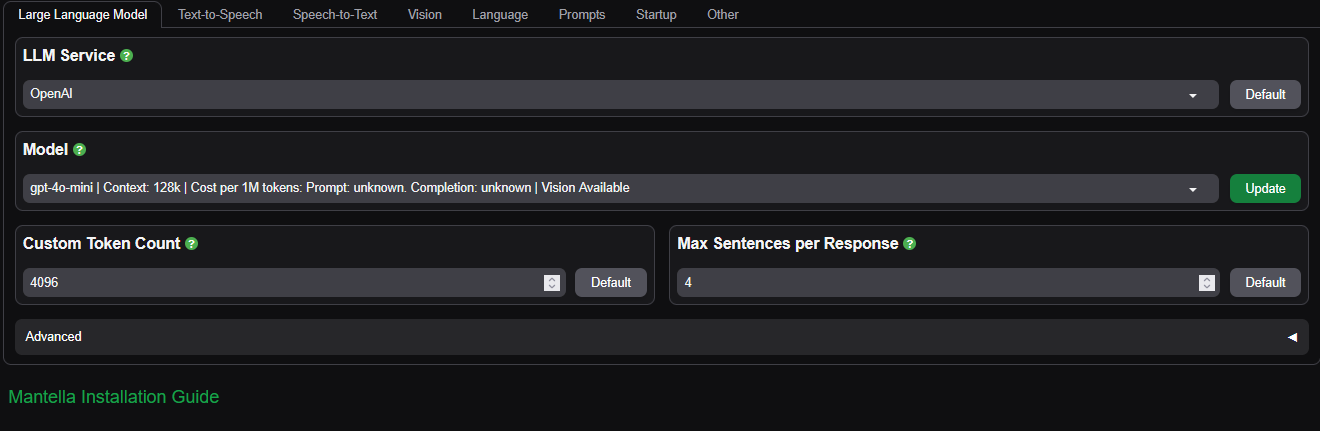
🧠 Large Language Model Tab#
LLM Service: Choose between external options (requires an account and API key):
OpenAI
OpenRouter
Or use local options (requires a powerful PC and locally installed LLM model):
koboldcpp
textgen-webui
Model: Choose an appropriate model from the dropdown. Be mindful of cost per token (external services only).
Custom Token Count: For unlisted models, enter the max token count here. Affects summary frequency.
Max Sentences per Response: Reduce if NPCs are talking too much or impersonating the player.
Advanced Settings (collapsible)
Temperature:
Lower values yield more predictable responses. Higher values encourage creativity. Range: 0–2.Top P:
Sets a cumulative probability threshold for token selection. Range: 0.0–1.0.Stop:
Stops output when any of the listed strings are encountered. Up to 4 strings, comma-separated. Default:#.Frequency Penalty:
Penalizes frequent tokens to reduce repetition. Typical range: 0.1–1.0 (can be negative).Max Tokens:
Maximum tokens in a response. Too low may result in empty outputs due to sentence trimming.Try to Filter Narrations from LLM Output:
Removes lines that appear as narrations (e.g.,*The Sole Survivor stands dramatically*).
🔊 Text-to-Speech Tab#
TTS Service: Choose from:
XVASynth
Piper TTS
XTTS
(You must have the correct installation for each.)
xVASynth Folder / XTTS Folder / Piper Folder:
Folder path to the currently selected TTS service.FaceFXWrapper Folder:
Only needed ifFaceFXWrapper.exeis not in[...] Data\Sound\Voice\Processing.Number of Words for TTS:
Minimum number of words per sentence sent to TTS. Increase if you hear artifacts at the end of sentences.
Higher numbers increase audio processing time.
Advanced Settings
XTTS Options: Refer to in-menu descriptions.
XVASynth Options: Refer to in-menu descriptions.
FO4 NPC Response Volume: Deprecated – this setting is no longer used.
Print TTS Output: Displays TTS output in Mantella Software’s console.
📼 Holotape (inside Fallout 4) #
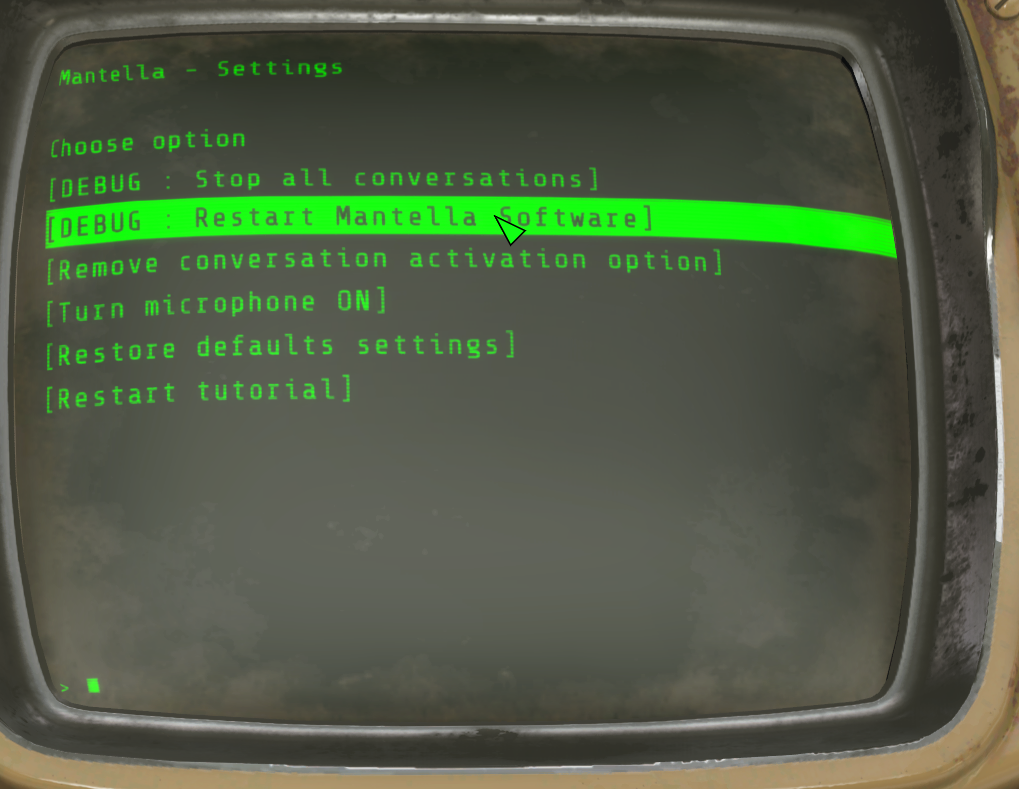
⚙️ Main Settings#
DEBUG: Stop all conversations
If you can’t start a new conversation with an NPC, try this option and wait about 4 seconds. The conversation system should reset, allowing you to begin a new one.Restart Mantella Software
Attempts to restart the Mantella Software.Add/Remove conversation activation option
Controls the alternative method for starting Mantella conversations. (Default key: R)Turn microphone ON/OFF
If turned ON, Mantella will default to Whisper STT. Turning it OFF will enable keyboard input automatically.Restore defaults settings
Resets all hotkeys and Holotape customizations to default.
🌀 Radiant Settings#
Turn Radiant Dialogue ON/OFF
When ON, Mantella will have NPCs engage in conversations with each other regularly.Set Radiant Distance
Customize the maximum distance from the player at which radiant conversations occur.Set Radiant Frequency
Customize the delay between each radiant conversation sequence.
📊 Event Tracking Settings#
Player Event Tracking Submenu
Customize which events are tracked and sent to the AI. Disabling some events may be useful if the AI becomes confused or if you’re using mods that generate excessive events.Turn all player events tracking ON/OFF
Enable or disable all event tracking related to the player, such as: Picking up objects, sleeping, being hit, sitting down, equipping items, etc.Turn all NPC events tracking ON/OFF
Enable or disable all event tracking for NPCs in conversation, such as: Entering combat, sitting down, equipping items, etc.
🧍 NPC Action Settings#
Turn NPC Aggro ON/OFF
Allows NPCs to become hostile toward the player through dialogue. (Only works for non-faction NPCs with relevant instructions in the prompt.)Turn NPC Follow ON/OFF
Allows NPCs to become allies through dialogue.Turn NPC Stay in Place ON/OFF
Forces NPCs to remain stationary during dialogue.Turn Allow NPC OpenInventory ON/OFF
Lets NPCs choose to open the player’s inventory through dialogue.
🌐 HTTP Settings (Desktop Only)#
Set HTTP Port
Change the port number if the default (4999) is already in use.
Click the option, close the Pip-Boy, and enter a number between 0–65535.
Make sure to match this value in the webUI config underOther > Advanced > Port.
⌨️ Hotkeys Settings (Desktop Only)#
NOTE: Keys must be set using DirectX scan codes (numeric format).
(See link: “Display keycode chart”)Set Text Response Hotkey
Used when not using the microphone. Press this key when you see:
« Awaiting player text input... »Set Initiate Conversation Hotkey
Starts a conversation or adds NPCs to an existing one.
(You can still use the Mantella gun or alt-activation key as well.)Set Game Event Hotkey
Send custom game events to the AI (not instantly sent to LLM).
Press during conversation to enter third-person narration (e.g., “Piper heard a gunshot.”)
Can be used repeatedly during a conversation.Display Keycode Chart (DirectX Scancodes)
Shows a chart of scan codes (same as the referenced link above).
🧾 Character Bios, Prompts, and Conversation Histories#
🧍 Character Bios#
Mantella uses a database of biographies
These bios help guide the LLM to accurately portray game characters. The database includes characters from the base game, DLCs, and a few popular mods.You can view this data in:
MantellaSoftware\data\Fallout4\fallout4_characters.csv
(This gives you a sense of the information needed to generate a Mantella-compatible character.)⚠️ Do not edit this file directly. Instead, create personal overrides or add new characters using the appropriate method below.
Unlisted Characters
If an NPC is missing from the database (e.g., a modded character), Mantella will attempt a best match for its voice and generate a simple default bio for the LLM.You can improve this by creating a character override or tweaking existing bios.
This ensures the LLM includes specific details that automated summaries might miss.Custom Bios
Stored in:
[...]\My Games\Mantella\data\Fallout4\character_overrides\Instructions for editing are available in the documentation (use the Fallout4 path, not Skyrim).
Mantella will apply changes on the next restart.
We recommend using a CSV editor like ModernCSV for clean edits.See here for more details about character overrides and custom bios.
💬 Prompts#
Prompts guide the LLM’s behavior
You can customize them through the Mantella configuration web page.Experiment to find what works best with your selected LLM.
If the LLM seems confused or inconsistent, consider simplifying the prompt or removing excess instructions.
Use prompts to define a consistent tone
Example:
« speak in a colorful manner, use unfiltered dialogue »This is a great way to establish rules that the LLM should always follow.
🗂️ Conversation Histories#
Mantella Software will automatically generate summaries of your conversations with NPCs.
However, these may not always capture all the nuances you want.To personalize or clean up these summaries, go to:
My Games\Mantella\data\Fallout4\conversationsInside, you’ll find
.txtfiles named like:
[NPC name]_summary_[number].txtUse a text editor (like Notepad++) to edit the most recent summary.
⚠️ Do not attempt to edit the JSON files in this directory.
🔄 Updating from a Previous Mantella Install#
Prepare your save:
Launch Fallout 4.
End all Mantella conversations.
Unequip the Mantella Gun.
Create a new save.
Disable the old Mantella mod using your mod manager.
(Optional but recommended) Clean your save using a tool like Fallrim Tools (ReSaver).
Open the cleaned save in Fallout 4. When prompted about the missing
Mantella.esp, click Yes.Save again (this time without Mantella loaded).
Enable the new Mantella mod in your mod manager.
Install the components as described in the Installation section, overwriting previous versions.
Set Fallout 4 to run in windowed mode, so you can view Mantella windows during startup.
Locate your previous Mantella install directory, which contains:
Mantella.execonfig.iniGPT_SECRET_KEY.txtdatafolder
Copy important settings from your old install:
Transfer
GPT_SECRET_KEY.txtto:
...\Fallout 4\Data\F4SE\Plugins\MantellaSoftware
Start Fallout 4 in windowed mode using F4SE.
⚠️ Do not manually start the old Mantella app — the new version will launch automatically.When Fallout 4 reaches the main menu, do not load a save yet. The mod isn’t ready.
Look for the Mantella.exe window — it may be hidden behind the game.The first launch may warn about incorrect config settings — this is normal.
The Mantella configuration page will open in your browser.
If you were using 0.8.2 or earlier : Open your old config.ini and manually transcribe your previous settings. (Warning : Copying the config.ini wholesale will probably not work, you’ll have to copy settings individually.)Verify and adjust the following settings:
Large Language Model tab:
Confirm model and parameters. If using OpenRouter, select your model from the dropdown.Text-to-Speech tab:
Copy settings from the old config. Confirm the TTS path is correct.Speech-to-Text tab:
Copy relevant settings if used.Vision tab:
Leave disabled for now.Language tab:
Set as needed.Prompts tab:
Copy any custom prompts.Other tab:
Adjust as required.
Once configuration is complete:
Quit Fallout 4.
Close the Mantella.exe window.
On first launch, Mantella will create a new directory at:
Documents\My Games\MantellaStart Fallout 4 a second time.
Look for the Mantella.exe window again. It should now display:
'Waiting for player to select an NPC...'⚠️ If you see any errors, double-check your config and file paths.
Once in-game conversations work, Mantella will generate new directories:
Documents\My Games\Mantella\data\Fallout4Including:
character_overridesconversations
If you previously modified
fallout4_characters.csv,
do not overwrite — instead, create a new.csvincharacter_overrides.
📖 More info about custom NPCs can be found here: Adding Modded NPCs DocumentationCopy your existing conversation histories from:
MantellaSoftware\data\Fallout4\conversations\default
to:
Documents\My Games\Mantella\data\Fallout4\conversations\defaultUse the in-game Holotape settings to fine-tune your setup.
(See: “Managing and Customizing Mantella” section.)Once everything is stable, you may safely remove old files:
MantellaSoftwaredirectory (pre-0.13.0), but keep yourconfig.ini, conversations, and character files if needed.SUP_F4SEandTIMmods — unless required by other mods.All
_mantella_*.txtfiles in the Fallout 4 directory.
❗ Troubleshooting#
Mantella doesn’t open the browser interface
Try manually entering the following in your browser:
http://localhost:4999/ui/?__theme=darkText response key doesn’t work
Make sure microphone is OFF in the Holotape Main Settings. You can also try binding it to another key (e.g.,;)
DirectX Scancode: 186Mantella launches to Skyrim instead of Fallout 4
This is likely a firewall issue.
Check your firewall’s auto-containment or rule settings.Dialogue shows in the console, but NPC doesn’t speak
Possible causes:Firewall containment blocking Mantella’s audio output.
Incorrect path to
LipGenerator.exeUse the alternate audio method instead, which relies on pre-generated files in:
Data\Sound\Voice\Processing
📄 Click this link here to troubleshooting files that need to be placed in \Processing\
Compatibility#
WARS - Weapon Addition and Replacement Suite conflicts with the Mantella Mod esp.
Mantella requires Windows 10 / 11 (it is yet unconfirmed whether it works on Windows 7)
Quick Trade & What’s Your Name will conflict with Mantella’s alternate activation hotkey (H). You can remove this hotkey activation in Mantella’s holotape [-> Main Settings -> Remove conversation activation option] to resolve the conflict.
❓ FAQ#
🧍 The AI keeps impersonating me!#
This is a common challenge due to the predictive nature of large language models (LLMs).
Here are a few things you can try:
Use the Stop Character feature in the web interface to prevent the LLM from continuing past certain phrases.
Reduce the Max Sentences per Response setting. Shorter outputs give the LLM fewer chances to impersonate the player.
Remove references to the player from the character bio
If impersonation persists, try resetting the conversation.
The LLM is more likely to mimic the player if the conversation log contains many previous examples of it doing so.
🧠 The LLM is hallucinating or making things up#
This is known as “hallucination” — where the LLM generates plausible but incorrect information.
Why it happens:
Smaller LLMs (e.g., 3B–7B models) have less detailed training data.
Fallout 4-specific knowledge might not be deeply encoded.
How to mitigate:
Use larger models if possible.
Add custom character overrides to reinforce lore and relationships.
Edit the prompt to include critical facts the NPC must remember.
🤖 What is a Large Language Model (LLM), anyway?#
You can think of an LLM as a very powerful version of your phone’s predictive text system.
Example:
When you type thank, your phone might suggest you.
An LLM, however, has been trained on billions of words — not just a dictionary.
The “B” number (like 8B, 70B, 405B) refers to the number of parameters the model has.
Larger = more knowledgeable and accurate.
But also more demanding on your hardware.
So instead of just suggesting one word, an LLM can generate full sentences or even paragraphs based on the prompt.
📚 How does the LLM behave in Mantella?#
Most LLMs are trained to follow user instructions and may include censorship guardrails — like a highly trained assistant with some restrictions.
Also, LLMs are stateless:
This means everything the LLM knows about the game, the player, and the conversation has to be present each time a new reply is generated.
This introduces a context limit, which varies by model/service.
If too much information is included, older parts of the conversation may be:
Trimmed
Summarized
Or cause confusion for the model
📝 Mantella mitigates this by summarizing NPC conversations at intervals, helping the model retain useful information without exceeding the context limit.
Steam Specific Fallout 4 Settings#
Warning
As Mantella accesses and writes to files within your Fallout 4 folder, it is unlikely to work correctly if you have Fallout 4 stored in Program Files / (x86). Please ensure that you have Fallout 4 is stored outside of this folder (eg C:\Games\Steam).
Steam does not allow to create a new Steam Game Library on the same disk. You can either move the whole Steam client outside as described on this Steam Support page or use LostDragonist/steam-library-setup-tool to allow multiple Steam Game Libraries on one disk.
data/voicelines/` folder. If this data takes up too much space over time, the contents of voicelines/ can be periodically deleted.
Issues#
If you are experiencing errors, please see Issues Q&A. Otherwise, please share the details of the errors and your MantellaSoftware/logging.log file on the Mantella Discord #issues channel.